


New article
Recently updated
Moving a portable noise monitor using Focus

Who is this article for?ANOMS administrators who need to relocate a portable noise monitor.
Focus access with management rights is required — granted per site; contact Ideagen support if you do not have access.
This article covers the end-to-end workflow for relocating a portable noise monitor in the field using Focus, including making it inactive, physically moving it, and re-registering it at the new location.
Before you start
This procedure assumes the portable monitor is already configured to stream data to the server. Configuring streaming is covered separately — contact Ideagen support for guidance.
Note: For multi-site solutions, where a monitor may be loaned to a different airport in a region, the streamer settings must be modified before the move.
For background on how monitors and locations are identified in ANOMS, see the published articles Understanding RMTs and Locations in ANOMS and Using the RMT Editor.
Understanding the process
The move itself is relatively straightforward and should be achievable in a few hours, depending on location and travel time. It is important to follow the steps in order. Making the monitor inactive first ensures no aircraft noise events are matched to the wrong aircraft, and no events are left unmatched, because otherwise ANOMS or NoiseDesk assumes the monitor is still sending data from its old location.
To relocate a portable noise monitor:
- Use Focus to make the monitor inactive.
- Go to site, pack up and move the monitor.
- Set up the monitor at the new site.
- Use Focus to move the monitor to the new site coordinates.
- Make the monitor active again.
Finding your monitors in Focus
The NMT Manager is found in the Service Management section of the Focus sidebar. If you cannot see the NMT Manager option, contact Ideagen support to have management rights added to your account.
Note: Menu names and paths may vary slightly between Focus versions.
The NMT Manager offers two views of your monitors:
- NMT Map — displays all active monitors on a map, with their live noise data where available. A histogram shows recent levels, and the number in the circle shows one-second samples. Click the wrench icon on any monitor to drill straight into its Edit NMT and Location panel
- Active Locations — lists the active monitors in a table, with Manage and Move actions for each row
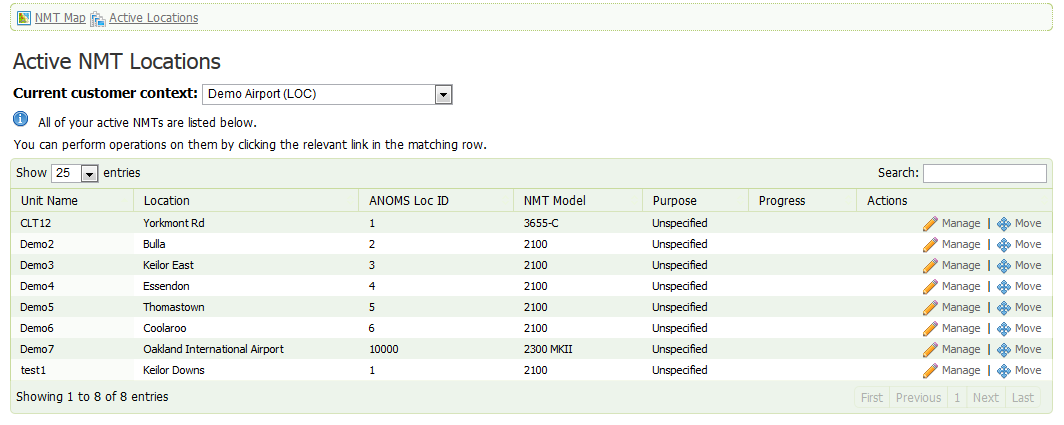
The Active NMT Locations list in Focus, showing each monitor with its location, ANOMS Location ID, model, and Manage and Move actions
Making the monitor inactive
To deactivate the monitor before moving it:
- In the Active Locations list, click Manage for the monitor you wish to move.
- Record all details shown on this page. When you move the monitor, a new location record is created and the details must be entered again — Location IDs are sequential and always increment. Taking a screenshot for later reference is often the easiest approach.
- Scroll to the bottom of the page, to the section titled Status/Notes.
- Change the Status field to Inactive.
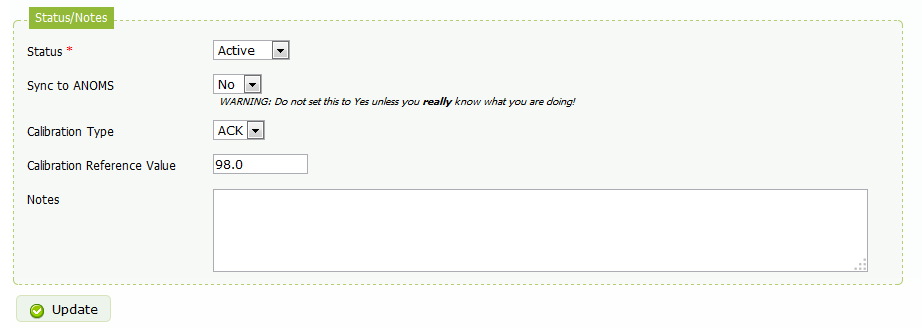
The Status/Notes section at the bottom of the management page — change Status to Inactive before relocating the monitor
The server now stops checking for and downloading noise data from this monitor. The monitor and its location move from the Active Locations list to the Inactive Locations list. It is now safe to physically relocate the monitor.
Physically moving the monitor
To relocate the monitor to the new site:
- Pack up and relocate the monitor to the new site.
- Record the latitude and longitude coordinates of the new location, or make sure you can identify it on the map when you return to the NMT Manager.
- After completing setup at the new location, perform a pistonphone calibration on the portable monitor. This is strongly advised to ensure the monitor is collecting data accurately.
Moving the monitor in Focus
To register the monitor at its new location:
- Log back into Focus and open the NMT Manager.
- Select the Inactive Locations list.
- Find the NMT and location you need to edit.
- Click the Move option. Have the location details you recorded earlier ready for entry.
- Increment the Location ID. This is required every time a monitor is moved.
- Enter the new coordinates using one of the four methods described below.
- Check that all other settings are entered correctly.
- Review the correlation parameters if the new location differs significantly in proximity to the airport or a flight path — see the article on adjusting NMT correlation parameters in Focus.
- Click Update to commit the settings to the database. The new location defaults to listing the attached monitor as Active.
Data from the monitor now begins streaming, and events are recorded at the new location.
Entering the new coordinates
You can enter the new coordinates using one of four methods:
- Use the map centre — scroll and zoom the map display until the crosshairs are centred on the new location, then click Use Map Centre. The coordinate fields are filled automatically
- Geolocate your position — if you are on site with the monitor and have internet access, click Geolocate My Position to pinpoint the latitude and longitude. The coordinate fields are filled automatically
- Look up the address — enter the street address in the Physical Location section and click Find Address on Map. The map snaps to the found address and updates the coordinates automatically
- Enter coordinates manually — if you have GPS coordinates, type the latitude and longitude directly. A conversion tool is provided if your coordinates are not in the required format
Moving a monitor between airports
A portable can be moved between sites (airports) if the sites are configured as grouped in Focus. Grouping must be set up by Ideagen for this to work — contact Ideagen support.
To change the assigned airport:
- Modify the Location Setup section in the Manage then Location area of the NMT Manager.
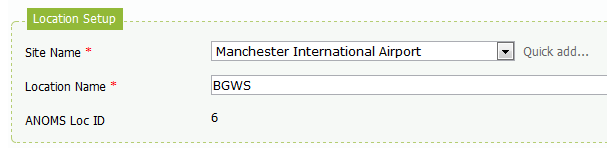
The Location Setup section, where the Site Name assigns the monitor's airport for grouped sites
Verifying the data flow
Once the move is complete, confirm the system is receiving data: the tag for the monitor on the map displays a graph of Leq samples. If the graph is updating, data is flowing from the new location.
Uploading site photos and documents
The field engineer can upload photos of the installed NMT, along with any other relevant documentation, using the file upload button on the Photos/Documents tab of the Edit NMT and Location page. Site photos are a useful record of the installation and its surroundings.
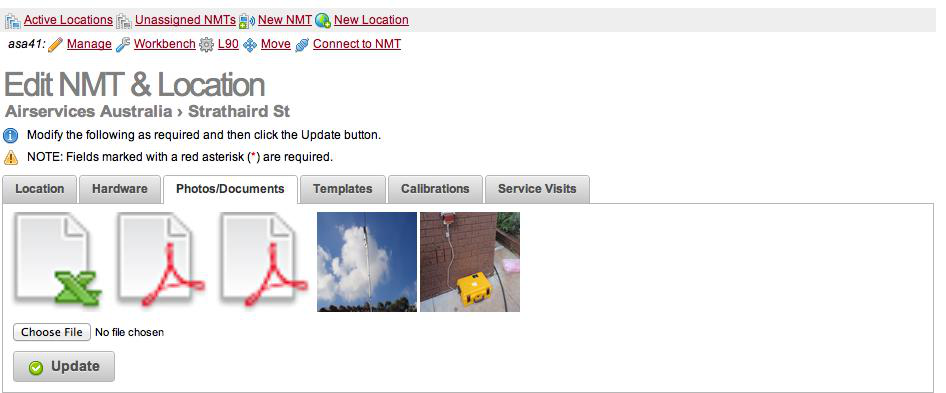
The Photos/Documents tab on the Edit NMT and Location page, with uploaded site photos and documents