


New article
Recently updated
Editing flight track points with the Track Point Editor

Who is this article for?Noise analysts who need to correct erroneous radar points on a flight track.
Access to the ANOMS Noise Analyst Workbench is required. The Track Point Editor is disabled by default — contact Ideagen support to have it enabled.
The Track Point Editor lets you correct individual radar points within a flight track, for grooming tasks such as fixing runway assignment problems or making tracks presentable to external users.
Understanding why track points need correction
Flight tracks are built from individual radar points. In most cases the source is a main radar head that derives the X and Y positions, and a secondary surveillance radar that supplies the callsign and altitude (the Z value). With consistent identification, the points can be assembled consecutively into a relatively accurate flight track.
Sometimes the source is an alternative technology such as MLAT or ADS-B, which in general is less accurate, and spurious or incorrect points may result. Even for main radar, environmental conditions (weather and geography) can degrade accuracy — especially through aircraft turns or where reflections occur — resulting in bad or off-track points. When you can identify track points that require correction, the Track Point Editor lets you fix them.
Preparing to edit track points
Note: The Track Point Editor is disabled by default and must be enabled in your site configuration. If you require access to this tool, contact Ideagen support.
Be aware of the following before editing any track:
- You are changing real-world data, and this can have consequences — including making the track-building algorithm behave abnormally
- The first and last track points cannot be edited or deleted
- Drastic changes to points can induce glaring errors in the track smoothing and splining algorithms. Best practice is to make small, incremental changes
Editing track points
It is recommended that you use the Track Point Editor in conjunction with the 3D Map so you can see the effect of your editing as you go.
To access the Track Point Editor:
- Start the Map Browser.
- Load data into the Operations Browser.
- Select an operation. It is highlighted in the Operations Browser and displayed on the map.
- Right-click the selected track in the Operations Browser.
- Select Properties.
- In the Properties window, select the Targets tab. You see a list of track points with their latitude/longitude coordinates, velocity and time stamps.
- Optionally, turn on Display Targets on the 3D Map. The selected track then shows its track points, and when you select a point in the Properties window the same point is highlighted on the map.
- On the Targets tab, right-click the track point you wish to edit.
- Select Open Track Editor.
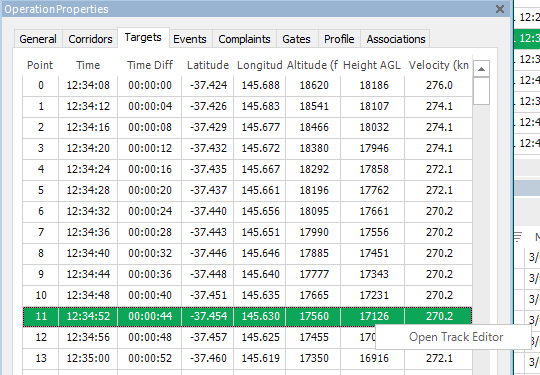
The Targets tab of the Operation Properties window, with Open Track Editor on the right-click menu
To modify track point coordinates:
- The Point # field shows which point you are editing. Use the arrow buttons to move back or forth along the track and edit a number of points in a row; as you scroll, the highlight on the Properties page moves to show the currently edited point.
- The Latitude and Longitude fields show the current coordinates of the point. Either type revised values directly into the fields, or click the Select Co-ordinates button and then left-click on the map to set the new point location.
To change the altitude:
- Enter the new value in the Altitude field.
To delete a point:
- Click Delete.
To preview changes without saving:
- Click Apply.
- View the revised track on the 3D Map.
To save your changes:
- Click Save Track to save the changes.
- Click Close to exit. To exit without saving changes, simply click Close.
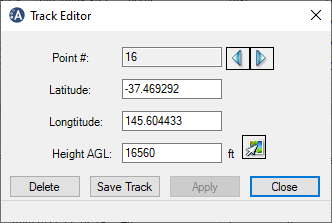
The Track Editor dialogue with point number, coordinates, height and the Delete, Save Track, Apply and Close buttons
Note: The Apply button only works when using the Select Co-ordinates (location) method.
Note: Clicking Close does not reset the track display; the track is only reset when you select another track.