


New article
Recently updated
Tagging records automatically with the Auto Tag Rule Manager

Who is this article for?Noise analysts who want records tagged automatically based on query rules.
Access to the ANOMS Noise Analyst Workbench is required.
The Auto Tag Rule Manager reduces workload by letting you specify conditions under which ANOMS automatically adds a tag to Operations, Noise Events, Noise Climate or Operational Segments records.
Understanding how auto-tagging works
The Auto Tag Rule Manager works in the same manner as the Update Rules Manager and the Violation Rules Manager: you first construct a query that identifies the records to be tagged, then create a rule that applies a tag to every record the query returns. Examples include operations that penetrated a gate or zone or used a specific runway, a Noise Event that was anomalously high at a particular time or location, or a climate containing noise parameters that require further investigation.
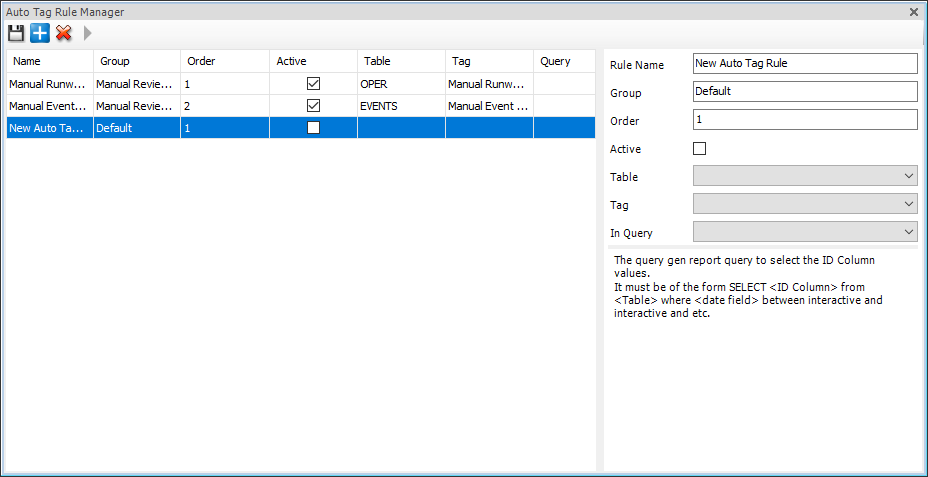
The Auto Tag Rule Manager with existing rules on the left and the rule definition fields on the right
Meeting query prerequisites
For a query to appear in the Auto Tag Rule Manager's query picklist, it must satisfy all of the following (see "Building, saving and running a Query Generator report"):
- It must be a Report query
- The date and time selection must be between Interactive and Interactive
- It must select the unique ID number of the subject (operation number, Noise Event ID, and so on)
- It must be saved as Public
Note: After saving the query, close and re-open the Auto Tag Rule Manager to repopulate the picklist — the new query should then appear in the list.
Creating an auto tag rule
To create an auto tag rule:
- Click the blue plus icon to add a new rule.
- Enter a descriptive Rule Name and, optionally, add the rule to a Group.
- Choose the Order.
- Select whether the rule is Active.
- Choose the Table to work in: Events, Hourly, Oper or Operational Segment.
- Choose the Tag to be applied.
- Choose the Query that identifies the candidates to be tagged.
- Click the Save icon next to the New icon.
Note: The tag itself must already exist — create it first through the Operations Editor (see "Understanding Data Tags and adding tags manually").
The Order only matters if the rule depends on another tag that needs to be applied first. Active rules apply from the moment they are saved to all future candidate records. Leaving the rule inactive means it can only be applied historically.
Reprocessing historical records
You can reprocess new rules historically so they apply to existing records.
To reprocess historical records:
- Click the green Run arrow to open the run dialogue.
- Enter the start and end dates.
- Click OK.
This runs all Active user-defined rules over the selected period.
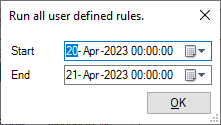
The run dialogue for applying all active user-defined rules across a historical date range
Note: A large time selection may take an appreciable amount of time to complete if many records are affected.