


New article
Recently updated
Understanding Track Density plots and Grid Definitions

Who is this article for?Noise analysts who want to visualise flight track concentrations and manage density grids.
Access to the ANOMS Noise Analyst Workbench is required.
Track Density gives you an immediate visualisation of the number of flight tracks passing through a particular area over a large time frame.
Understanding how Track Density works
A Track Density plot is generated by splitting an area into small grid squares and counting the number of flights that pass through each square. When displayed on the map, each grid square is coloured by the number of tracks that passed through it: low counts tend to be represented by cool colours (such as dark blue) and high counts by hot colours (such as bright red).
The Track Density feature contains two major components:
- Grid Definitions — stored grids used in the Track Density generation process
- Track Density Tasks — the plots themselves, each built from a Grid Definition and a set of flights (see "Creating and viewing a Track Density plot")
You must first define a Grid Definition, and then generate a Track Density using that grid. The Grid Definition Manager is where you manage the stored grids.
Opening the Grid Definition Manager
To access the Grid Definition Manager:
- From the Main Menu, click Data.
- Click Track Density.
- Choose Grid Definition Manager.
The Grid Definition Manager displays, listing any existing grids with their width, height and resolution.
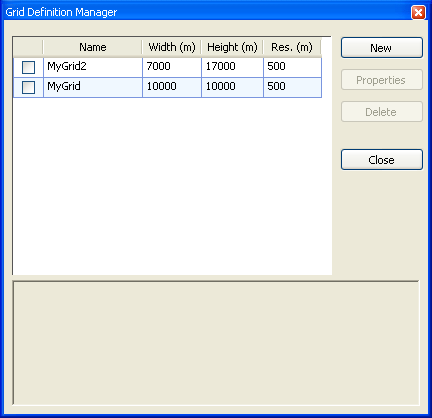
The Grid Definition Manager listing stored grids with their width, height and resolution
Creating a new grid
To create a new grid:
- In the Grid Definition Manager, click New.
- In the Name box, type the name of the grid.
- In the Description box, type text that describes the function of the grid.
The New Grid dialog displays and a default grid appears on the Map Browser, centred on the airport reference point.
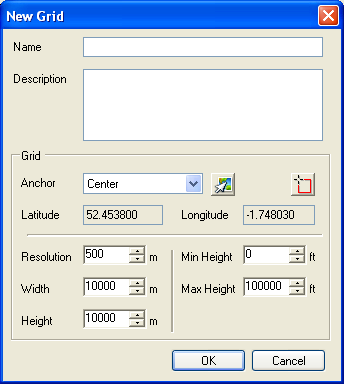
The New Grid dialog with anchor point, position, resolution, size and height range settings
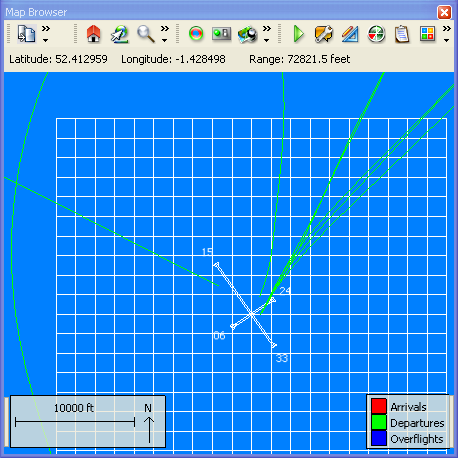
The default grid displayed on the Map Browser, ready to be repositioned and resized
Drawing the grid on the map
To draw the grid on the map:
- In the New Grid dialog, click the Draw Grid button.
- On the map, click to position the first corner of the grid.
- On the map, click again to position the diametrically opposite corner of the grid.
The grid details are filled in automatically.
Adjusting the grid dimensions
The resolution determines the size of an individual square within the grid. The width and height of the grid are always exact multiples of the resolution, so you see the width and height adjust as you change this value.
To adjust the grid dimensions:
- In the Resolution box, adjust the resolution of the grid to the desired square size.
- In the Width box, adjust the width of the grid to the required size.
- In the Height box, adjust the height of the grid to the required size.
- In the Min Height box, set the minimum height value to be used by this grid.
- In the Max Height box, set the maximum height value to be used by this grid.
The grid resizes itself around the currently selected anchor point. The minimum and maximum heights define the height-above-airfield range for the grid: tracks below the minimum height and tracks above the maximum height are ignored by Track Density calculations that use this grid.
Repositioning the grid
You can position the grid using one of five anchor points: Bottom left, Bottom right, Top left, Top right or Center.
To reposition the grid:
- Select the anchor point from the Anchor drop-down list.
- Click the Move Grid button.
- Click a point on the map.
The grid moves so that the selected anchor point sits at the clicked map point.
Saving the grid
To save the grid:
- When you are satisfied with the grid, click OK.
The grid definition is created, the dialog closes and the new grid appears in the Grid Definition Manager's list.
Note: Once you have saved a grid, you cannot change any of its dimensions.
Displaying existing grids on the map
To display existing grids on the map:
- In the Grid Definition Manager, select the checkbox in the left-most column for the grid you want to display.
- To remove a displayed grid from the map, clear its checkbox.
Renaming a grid
Only the name and description of a Grid Definition can be changed. Once a grid is created, its width, height, resolution and position cannot be modified, because of the impact this would have on Track Densities already generated with that grid.
To rename a grid:
- In the Grid Definition Manager, select the required grid.
- Click Properties.
- Edit the name and description as required.
- Click OK.
Deleting a grid
To delete a grid:
- In the Grid Definition Manager, select the required grid.
- Click Delete.
Note: You cannot delete a grid that is currently associated with a generated Track Density or a scheduled Track Density.