


New article
Recently updated
Creating a new noise monitor and assigning it to a location

Who is this article for?ANOMS administrators who need to add a noise monitor and assign it to a Location.
Administrator access to the ANOMS Noise Analyst Workbench is required. Ideagen recommends doing this with your support contact.
ANOMS tracks which noise monitors are placed at which locations, so every active monitor should have a location assignment.
Creating a new noise monitor
Note: It is strongly suggested that you create new noise monitors with the assistance of your Ideagen service delivery or support contact.
To create a new noise monitor:
- In the RMT Editor window, click New RMT.
- In the RMT ID box, type a unique number for the RMT ID.
- In the Analyser list, select the required noise monitor type.
- In the Mobility list, select portable or fixed.
- Click OK.
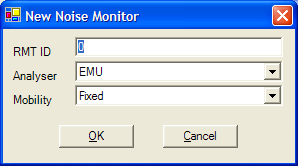
The New Noise Monitor window
Understanding noise monitor parameters
The following table describes the parameters for a new noise monitor:
Parameter | Definition |
RMT ID | Unique number to identify the RMT |
Analyser | Type (model) of noise analyser |
Mobility | Fixed or portable monitor |
Assigning a noise monitor to a location
Selecting a monitor in the list of noise monitors automatically highlights the location assigned to it in the list of locations. You can assign a noise monitor to a location in two ways: as you create a new monitor and location, or at any other time from the existing lists.
Assigning as you create a new monitor and location
To assign a monitor during creation:
- Create a new location and leave the new location highlighted.
- Create a new noise monitor.
The new noise monitor is automatically assigned to the currently highlighted location.
Assigning from the existing lists
To assign a monitor from existing lists:
- From the noise monitors list, select the required noise monitor.
- From the locations list, select the required location.
- Click Set Location.
- In the confirmation dialogue box, click Yes.