


New article
Recently updated
Scheduling reports with the Report Schedule Manager

Who is this article for?Noise analysts who need reports generated automatically on a schedule.
Access to the ANOMS Noise Analyst Workbench is required. Scheduling must be enabled for the report in the ANOMS Configurator.
ANOMS can run reports automatically on a schedule and publish each run to a Report Topic, so authorised users always see the latest version.
Before you begin
The Report can be scheduled field in the Configurator must be selected before a report is available for scheduling. Contact your ANOMS system administrator if a report does not appear.
You can schedule reports from the Reports Wizard or from the Report Schedule Manager. Linking the schedule's Report Topic to a Report Task on the Task Bar gives users one-click access to the latest run.
Opening the Report Schedule Manager
To access the Report Schedule Manager:
- In the Reports menu, select Schedule Reports.
- Select a schedule name to review that schedule's details.
- Click New to create a schedule, Edit to modify the selected schedule, or Delete to delete it.
Creating a new schedule
Note: Create the Report Topic before you start.
To create a new schedule:
- In the Reports menu, select Schedule Reports.
- Click New.
- Select the required report.
- Click Next.
- Select the required Period of Occurrence: Daily, Weekly, Monthly, Yearly, Every x number of days, or Every Weekday (Monday to Friday).
- Under Date Range, set the Schedule Start Date.
- Under Date Range, set the Next Report Dates.
- Click Next.
- Modify any parameter values if required.
- Click Next.
- If required, type a new schedule name in the Schedule Name box.
- Select the Publish Report to Topic check box.
- In the Topic box, select the required Report Topic.
- Click Save Schedule.
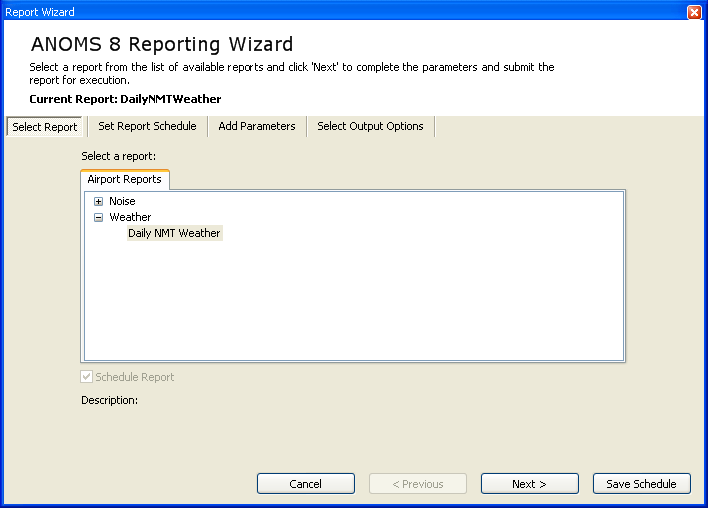
The Report Wizard in scheduling mode: the Schedule Report option adds Set Report Schedule and Select Output Options tabs
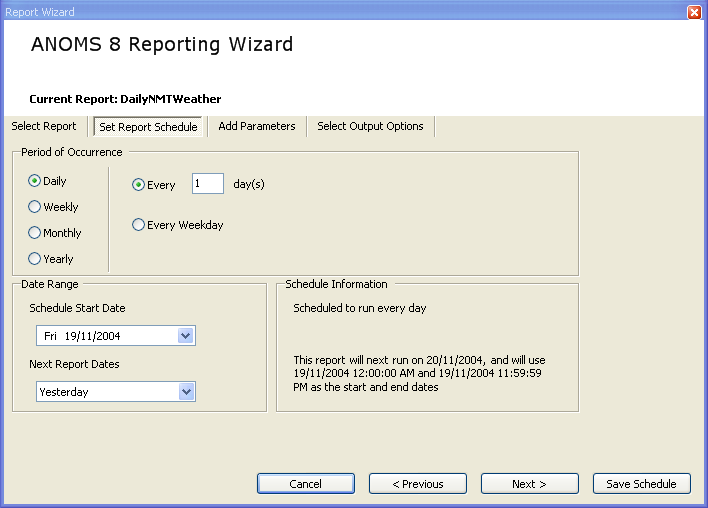
The Set Report Schedule tab: Period of Occurrence, Schedule Start Date and Next Report Dates, with a plain-language summary of the schedule
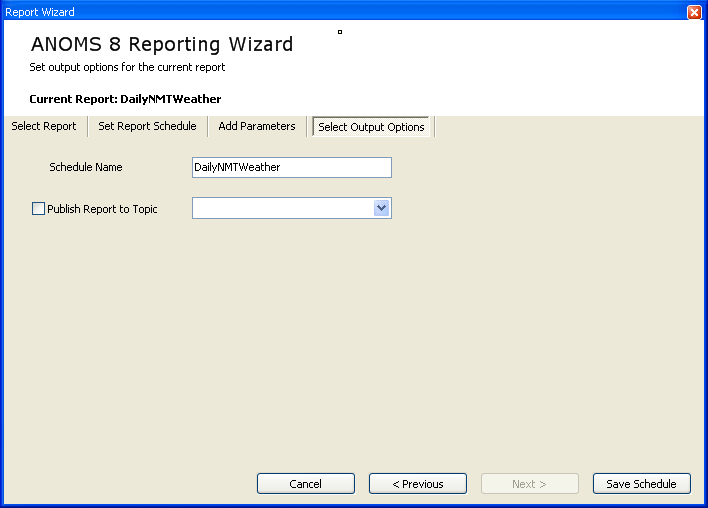
The Select Output Options tab, where the schedule is named and published to a Report Topic
Note: If you have not created a Report Topic yet, save the schedule, create the topic, then select the schedule in the Report Schedule Manager, click Edit and assign the topic.
Editing a schedule
To edit an existing schedule:
- In the Reports menu, select Schedule Reports.
- Select the required schedule.
- Click Edit.
- Make the required changes.
- Click Save Schedule.
Deleting a schedule
To delete a schedule:
- In the Reports menu, select Schedule Reports.
- Select the required schedule.
- Click Delete.
- To confirm, click Yes.