


New article
Recently updated
Using Map Tags to display flight track details

Who is this article for?Noise analysts who need to display flight details against tracks on the map.
Access to the ANOMS Noise Analyst Workbench is required.
Map Tags display information about individual points, or track targets, that make up a flight track in both 2D and 3D views.
Displaying the Map Tags toolbar
To access the Map Tags toolbar:
- On the Map Browser toolbar, click Map Tags.
The Map Tags toolbar contains buttons to assign a Map Tag to a track target, delete a Map Tag, delete all Map Tags, move a Map Tag, assign a Map Tag to a new target, change the information displayed in a Map Tag, and cancel.
Adding a Map Tag
To add a Map Tag:
- On the Map Tags toolbar, click the Assign a Map Tag button.
- In the Map Browser, select a track target on the flight track.
Deleting a Map Tag
To delete a single Map Tag:
- In the Map Browser, select the Map Tag you want to delete.
- On the Map Tags toolbar, click the Delete a Map Tag button.
Deleting all Map Tags
To delete all Map Tags:
- On the Map Tags toolbar, click the Delete all Map Tags button.
- When prompted, confirm that you want to delete all Map Tags.
Moving a Map Tag
To move a Map Tag:
- In the Map Browser, select the Map Tag you want to move.
- On the Map Tags toolbar, click the Move a Map Tag button.
- In the Map Browser, click where you want to move the Map Tag.
Assigning a Map Tag to a new track target
To assign a Map Tag to a new target:
- In the Map Browser, select the Map Tag you want to assign to a new target.
- On the Map Tags toolbar, click the Assign a Map Tag to a new target button.
- On the flight track, click the new track target you want to assign the Map Tag to.
Changing the information displayed in a Map Tag
To change the information displayed:
- In the Map Browser, select the Map Tag whose information you want to change.
- On the Map Tags toolbar, click the Change the information displayed button.
- In the Tag Properties window, select the information you want to display.
Configuring Tag Properties
To configure Tag Properties:
- On the Map Tags toolbar, click the Change the information displayed button.
- Click the tab corresponding to the object to be changed.
- Select the option boxes to display or hide details in the tag.
- Click Apply.
- When your changes are complete, click Close.
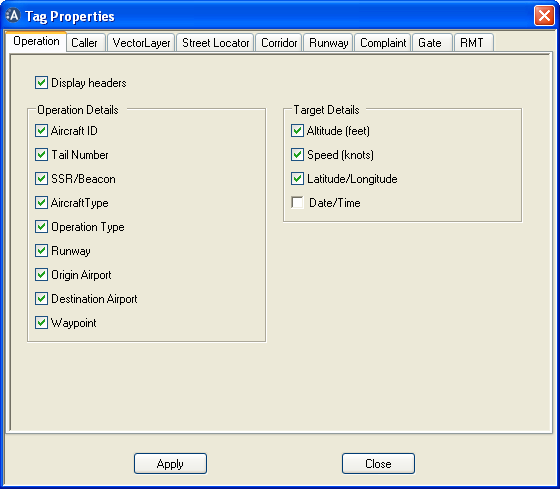
The Tag Properties dialogue box, showing the operation and target details that a Map Tag can display
Note: The Map Tag automatically updates with the new details.
Setting the Locator, distance units, grid lines, and range circles
The Points tab of the Feature Manager controls the map's reference settings: the point of origin (the Locator), the default distance unit, and the spacing of grid lines and range circles. You can also use the Locator to measure the range between two points on the map.
The Feature Manager Points tab allows you to:
- Set the point of origin
- Set the default distance units
- Enable and specify the spacing of grid lines
- Enable and specify the spacing of range circles
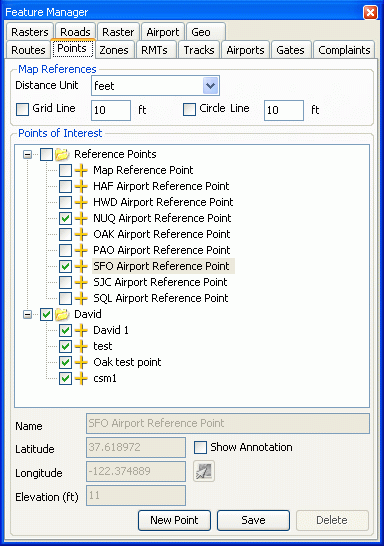
The Feature Manager Points tab, showing the map references settings and the Points of Interest list