


New article
Recently updated
Creating a Track Statistics plot

Who is this article for?Noise analysts who need to calculate dispersion paths for a corridor.
Access to the ANOMS Noise Analyst Workbench is required.
A Track Statistics plot is generated from a set of mapped flights and a selected corridor.
Creating a Track Statistics plot
To create a Track Statistics plot:
- Populate the Operations Browser with the desired flights (usually flights from a specific runway using a single path or corridor).
- Select the flights you wish to run Track Statistics on so they are shown on the Map Browser.
- Click the Data menu.
- Select Track Statistics Analysis.
- Click on the folders to view the corridors in the sets.
- Select a corridor (the path or corridor is shown on the map, and the Operations Count displays the count of flights - higher numbers of flights give a better result).
- Use the drop-down to select the number of Dispersion Paths (you can choose between one and nine).
- To change the default percentages of the dispersion paths, click the Settings button.
- Click in the Percentage column of any of the bands to change the weighting (the percentages must total 100, and you will not be able to proceed until this condition is met).
- Click OK once the total dispersion equals 100%.
- Click the Calculate button to start the analysis (a confirmation message appears when it completes).
- Display the results on the Map Browser using the Median Line, Mean Line, Mode Line, and Dispersion Layer options in the Output Display Control section of the panel.
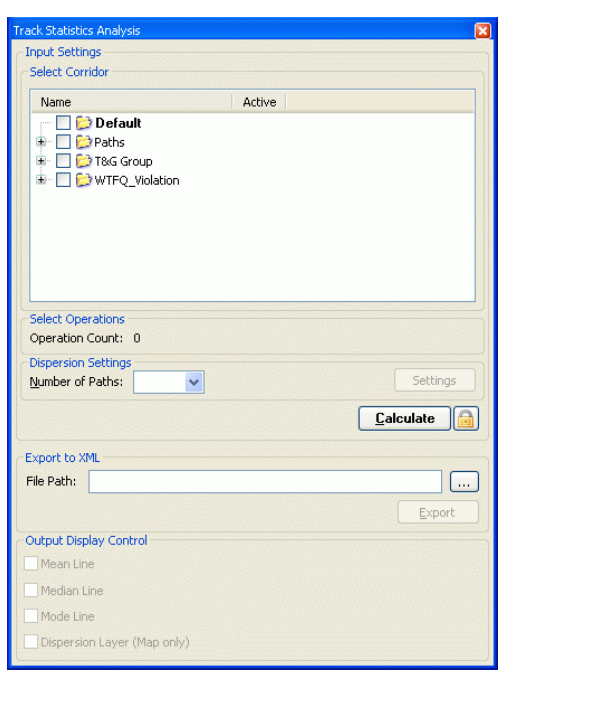
The Track Statistics Analysis panel: corridor list, Number of Paths, Calculate, and the Output Display Control options
Creating another Track Statistics plot
To create another plot:
- Click the padlock button to unlock the panel.
- Create the plot following the steps in the previous section.
Exporting Track Statistics
You can export Track Statistics plots to an XML format or use the standard Export to GIS format.
To export Track Statistics:
- Generate a Track Statistics plot.
- On the panel, under the Export to XML section, click the browse button.
- Select a folder destination and a descriptive filename for the export.
- Click Save.
- Click Export (a confirmation message appears after a successful export).