


New article
Recently updated
Editing gate properties

Who is this article for?Noise analysts who need to adjust a gate's name, filtering, position or altitude limits.
Access to the ANOMS Noise Analyst Workbench is required.
Every gate has a set of properties controlling its name, active status, filtering, position, and altitude limits.
Opening the Gate Properties window
To access the Gate Properties window:
- In the Gates list, select the required gate.
- On the Gates and Corridors toolbar, click Properties.
The Gate Properties window appears.
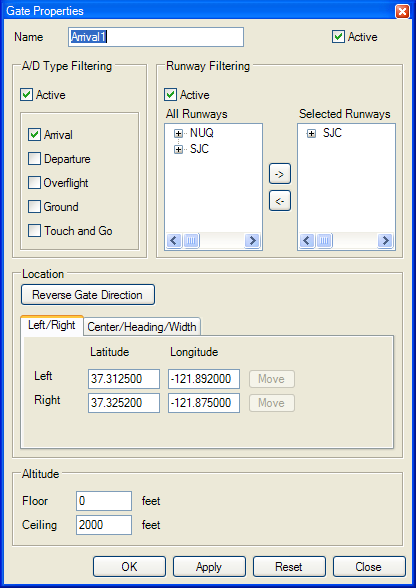
The Gate Properties window, showing name, A/D type filtering, runway filtering, location, and altitude settings
Editing a gate
To edit a gate:
- Open both the Map Browser and the Gate Properties window.
- In the Name box, type the gate name.
- Select the Active check box.
- In A/D Type Filtering, select the Active check box.
- Select the appropriate operation types (optional).
- In Runway Filtering, select the Active check box.
- Select the required runways (optional).
- Set the gate direction with Reverse Gate Direction.
- Set the Left and Right latitude and longitude, or set the Centre point and Width.
- In the Heading box, type a heading value between 0 and 359.
- Click Apply.
- On the Map Browser, review the gate's changes.
- If the gate is correct, click OK.
Note: The gate must be active to be eligible for Gate Analysis.
Understanding gate editing criteria
Setting | Description |
Gate name | Type a new name for the gate in the Name field. |
Gate status | Controls whether the gate is entered into the database when Gate Analysis runs. Active (the default) enables the gate for Gate Analysis; Inactive disables it. Both active and inactive gates still appear in map layers and remain available for Penetration Gate graphs and plots. |
Gate filters | Restrict Gate Analysis to specific operation modes (Arrival, Departure, Overflight) and specific runways. The default is no filters set, which includes all operations from all runways. These filters affect Gate Analysis only and do not change what is displayed in Penetration Gate plots. |
Choosing how a gate is dimensioned
The position and width of a gate can be defined either by Left and Right endpoints, or by Centre, Heading and Width values.
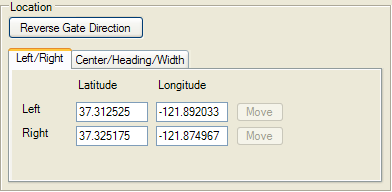
The Left/Right tab, defining the gate by the latitude and longitude of each endpoint
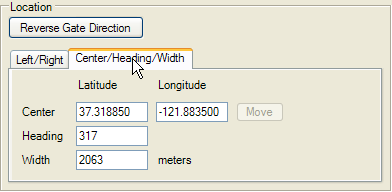
The Centre/Heading/Width tab, defining the gate by its centre point, heading, and width in metres
Note: The default setting for gate editing is Left/Right. You can switch between Left/Right and Centre/Heading/Width while editing the same gate.
Reversing the gate's direction
A gate's direction is represented by an arrow pointing in the direction that Gate Analysis will consider as going forward through the gate. The direction is stored in the database and can be displayed in the Penetration Gate graph.
To reverse the gate's direction:
- Under Location, click Reverse Gate Direction.
This is the same as moving the heading value through 180 degrees.
Maintaining Left/Right gate dimensions
To maintain Left/Right gate dimensions:
- Under Location, click the Left/Right tab.
To move the gate's left endpoint:
- On the Map Browser, move the cursor to a new position.
- Click the new position.
- In Gate Properties, click Move next to the Left Longitude box.
- Click Apply to see the effect.
To move the gate's right endpoint:
- On the Map Browser, move the cursor to a new position.
- Click the new position.
- In Gate Properties, click Move next to the Right Longitude box.
- Click Apply to see the effect.
Maintaining Centre/Heading/Width gate dimensions
To maintain Centre/Heading/Width gate dimensions:
- Select the Centre/Heading/Width tab.
To move the gate's centre point:
- On the Map Browser, move the cursor to a new position.
- Click the new position.
- In Gate Properties, click Move next to the Centre Longitude box.
- Click Apply to see the effect.
To change the gate heading:
- In the Heading box, type a value from 0 to 359.
- Click Apply to see the effect.
To change the gate width:
- In the Width box, type a value.
- Click Apply to see the effect.
Changing the gate floor and ceiling
To change the gate floor and ceiling:
- In the Floor box, type a value.
- In the Ceiling box, type a value.
- Click Apply to see the effect.
Tip: Use the 3D mode to view the gate's floor and ceiling.
Entering coordinates directly
For the Left, Right, and Centre dimensions, you can type the latitude and longitude values directly into the appropriate boxes instead of positioning them on the map.
Storing the new gate properties
To store the changes:
- Click OK.
Note: Although the changes are stored, they are not yet saved to the database. See the article Saving and deleting gates and corridors.